Along with the alternating spring-like and wintry weather, February also brings Reading Week. For some university students, this means a week off to gallavant somewhere hot and humid. But for others, it's used as its name implies: a week to catch up on readings and assignments.
For me, it meant doing some more creative cooking than I have for the past few weeks. Last week, I did a one-week intensive cleanse much like the one I did a year ago. There was a lot of grumbling out of me, and more of the same kinds of refusals that I used last time – no horrible alkaline soup, for example. And I meant to blog about it, I really did! But the week before Reading Week was packed with newspaper production and midterms and lugging around a bajillion-pound broadcasting camera.
But I promise you (eep!) I am back on the Glorious Kitchen Unicorn of Blogginess. I have ideas that will probably, at some point, come to fruition, but I dare not mention them yet.
If you're on a reading break too, I implore you to make a little hummus. And if you have the fortitude, make some pita too. Yum.
The 2010 February Daring COOKs challenge was hosted by Michele of Veggie Num Nums. Michele chose to challenge everyone to make mezze based on various recipes from Claudia Roden, Jeffrey Alford and Naomi Dugid.
I cooked this up on Feb. 14, the day the challenge was due to be posted to my blog. I was down to the wire around 3 p.m. when I got home from an improv comedy class (horror of horrors! But it was kind of fun and I survived) and had an hour to get the house together before a friend arrived for sparkling wine and two kinds of cheese pie.
I make hummus with some regularity, but my past couple of batches have been kind of lumpy and...just wrong. But this recipe turned out just right. I think I might use a little more garlic in the future, but even as-is, it might be my new recipe. I halved the batch and added a couple of chipotle peppers with adobo sauce for a spicy smoky version.
I made a simple guacamole when I fixed myself a hummus snack. Just mash half an avocado with some lime juice and a bit of salt.
Hummus – Recipe adapted from The New Book of Middle Eastern Food by Claudia Roden
Prep Time: Hummus can be made in about 15 minutes once the beans are cooked. If you’re using dried beans you need to soak them overnight and then cook them the next day which takes about 90 minutes.
1.5 cups dried chickpeas, soaked in cold water overnight (or substitute well drained canned chickpeas and omit the cooking) (10 ounces/301 grams)
2-2.5 lemons, juiced (3 ounces/89ml) *I didn't have fresh lemons so I used 4 tbsp of lemon juice.
2-3 garlic cloves, peeled and crushed
a big pinch of salt
4 tablespoons tahini (sesame paste) OR use peanut butter or any other nut butter—feel free to experiment) (1.5 ounces/45 grams) *Seriously, use tahini though. At my grocery stores it's either with the peanut butter or the in the "health" food area with almond butter etc.
additional flavorings (optional) I would use about 1/3 cup or a few ounces to start, and add more to taste
Directions:
- Drain and boil the soaked chickpeas in fresh water for about 1 ½ hours, or until tender. Drain, but reserve the cooking liquid.
- Puree the beans in a food processor (or you can use a potato masher) adding the cooking water as needed until you have a smooth paste.
- Add the rest of the ingredients and mix well. Adjust the seasonings to taste.
The pitas were delicious too, and a little time-consuming, but not very difficult. My friend had the brilliant idea to put cheese into it before baking: amazing! I rolled out a couple pieces of dough, put a handful of grated old cheddar in the middle, then wrapped the bundle up and rolled it out again. It only took a couple of minutes to cook and it was one of the best – nay, THE best – cheese pitas I've ever had. I think I will try additional fillings next time.
Not all my pitas puffed up as they were supposed to, and I think they would have browned more nicely if I had used a pizza stone instead of baking sheets, but they were all fabulous.
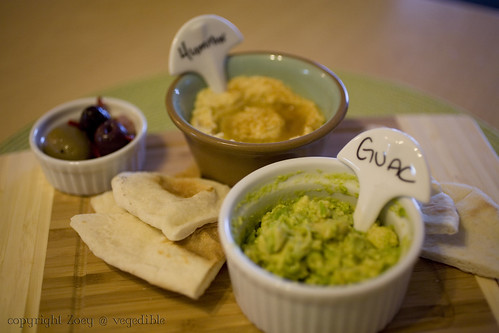
I put together a little tasting platter, all for me! It included one pita, some hummus, guacamole and a few olives.
Pita Bread – Recipe adapted from Flatbreads & Flavors by Jeffrey Alford and Naomi Duguid
Prep time: 20 minutes to make, 90 minutes to rise and about 45 minutes to cook
2 teaspoons regular dry yeast (.43 ounces/12.1 grams)
2.5 cups lukewarm water (21 ounces/591 grams)
5-6 cups all-purpose flour (may use a combination of 50% whole wheat and 50% all-purpose, or a combination of alternative flours for gluten free pita) (17.5 -21 ounces/497-596 grams)
1 tablespoon table salt (.50 ounces/15 grams)
2 tablespoons olive oil (.95 ounces/29 ml)
Directions:
- In a large bread bowl, sprinkle the yeast over the warm water. Stir to dissolve. Stir in 3 cups flour, a cup at a time, and then stir 100 times, about 1 minute, in the same direction to activate the gluten. Let this sponge rest for at least 10 minutes, or as long as 2 hours.
- Sprinkle the salt over the sponge and stir in the olive oil. Mix well. Add more flour, a cup at a time, until the dough is too stiff to stir. Turn it out onto a lightly floured surface and knead for 8 to 10 minutes, until smooth and elastic. Rinse out the bowl, dry, and lightly oil. Return the dough to the bowl and cover with plastic wrap. Let rise until at least doubled in size, approximately 1 1/2 hours.
- Place a pizza stone, or two small baking sheets, on the bottom rack of your oven, leaving a 1-inch gap all around between the stone or sheets and the oven walls to allow heat to circulate. Preheat the oven to 450F (230C). *I stacked 2 crappy baking sheets on top of one another.
- Gently punch down the dough. Divide the dough in half, and then set half aside, covered, while you work with the rest. Divide the other half into 8 equal pieces and flatten each piece with lightly floured hands. Roll out each piece to a circle 8 to 9 inches in diameter and less than 1/4 inch thick. Keep the rolled-out breads covered until ready to bake, but do not stack.
- Place 2 breads, or more if your oven is large enough, on the stone or baking sheets, and bake for 2 to 3 minutes, or until each bread has gone into a full balloon. If for some reason your bread doesn't puff up, don't worry it should still taste delicious. Wrap the baked breads together in a large kitchen towel to keep them warm and soft while you bake the remaining rolled-out breads. Then repeat with the rest of the dough.


