I’ve been inhabiting an otherwise empty house for the past week and I think it’s had an effect on my tweeting habits. I stated officially (in an officious class presentation about Twitter) [I just learned the word officious.] that you shouldn’t be afraid to Tweet, because people following you are doing so because they enjoy what you have to say. [I abhor telemarketers who don’t leave messages. I would call back if they left messages.] Even so, I feel uncomfortable clogging up my channel with the fairly mundane narration of my life.
But having nobody to speak to while I am sitting at home lamenting my workload, or, conversely, while I am sitting at home feeling particularly inspired, has resulted in more tweeting. [Almost time to break out yesterday’s enchilada’s, methinks.] I’m a bit addicted to Twitter, I guess. It’s been dubbed micro-blogging, and I think that’s accurate. There’s still a chance to [why are there no synonyms for the verb version of craft?] articulate yourself intelligently, but you’re not as pressured to produce something substantial.
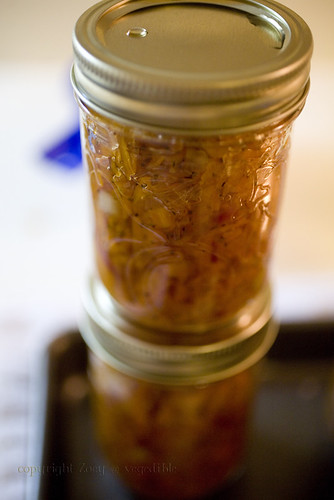
Maybe that’s the problem with me and Vegediblogging lately. I feel so much pressure to produce something that fits the criteria of my three blogging communities or even just something that I've made out of the blue, that I just put it off, put it off, put if off. In fact, I even made onion jelly for last month’s can jam, but still haven’t posted it.
This didn’t start out as a post to relinquish me from my posting duties. But I think this quasi-stream of consciousness has led me to the point where I needed to come. I’m a word addict and I do love blogging, but I have to find a way to make it work for me.
Let’s try this: I’ll start blogging things other than recipes (but recipes too!) that reflect me a little bit more. Things like my burgeoning pipe dream [gosh, pipe dream sounds a lot like pipe bomb. Wondering about the etymology of the phrase] to sell mustard at the farmer’s market across the street, or links to other food and journalism blogs that entice my taste cells and brain buds.
Yes, let’s try that.
(PS: I was totally going to post photos but Photoshop keeps freezing when I do simple things like press file + open. Sad.)

Wednesday, April 7, 2010
Thursday, March 18, 2010
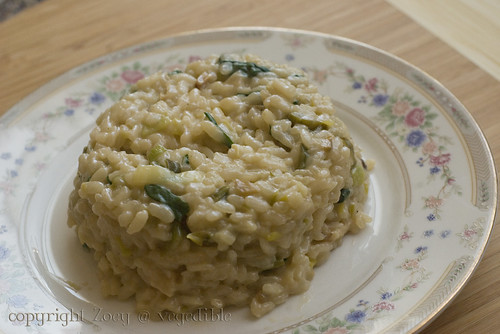
Daring Cooks March: Risotto
If you've ever watched an episode of Hell's Kitchen, chances are good that you've probably seen Gordon Ramsay dropping f-bombs all over the place. Chances are also good that a few of them were dropped over risotto: too salty, too bland, too mushy, too firm! Well, friends, I certainly hope that hasn't made risotto into some unattainable dish in your mind; something that you'll never hope to recreate at home with $5 worth of ingredients and something you'll have to plunk down $19 for, or even $27 because restaurants really like to put seafood and sausage in there.
To make a tasty risotto, you could really get by with just broth, an appropriate breed of rice and oil. If you've got more than three ingredients in your pantry, add butter, cheese, onions/shallots/leeks and some fresh cracked black pepper.
For this challenge, I used arborio rice, which is a short-grain variety that cooks up firm, creamy and chewy. I would have loved to use some soft, pungent goat cheese and shallots, but I decided to stay reasonable and instead used feta cheese and a leek I bought at Wal-Mart (I can't believe I bought produce at Wal-Mart!). I used dehydrated mushrooms for the first time, and though I wasn't super impressed with them, I will give them another chance.
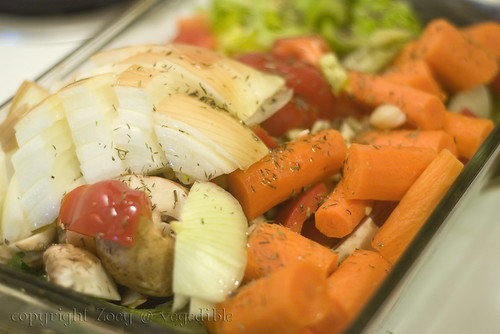
Other than preparing the risotto, we also had to make our own stock. There was no mandated veggie stock recipe, so I worked with one from Epicurious and made my own edits based on what I had on hand. A good veggie stock is pleasantly simple.
Basic Roasted Vegedible Stock
adapted from Epicurious
- 8-10 crimini mushrooms, halved
- 1 medium onion, chopped into 2-inch chunks
- 2 carrots, chopped into 2-inch pieces
- 2 celery sticks, chopped into 2-inch pieces
- 1 red bell pepper, chopped in 1-inch pieces
- Any vegetable ends you've been saving in the freezer
- 4 garlic cloves coarsely chopped
- 2 tsp dried thyme
- 2 tablespoons olive oil
- 1 cup of dry white wine
- 2 bay leaves
- 2 litres of water
- Preheat oven to 425 F.
- In a roasting pan (I use a pyrex casserole dish), toss together veggies, garlic, thyme and oil.
- Roast in middle of oven, turning occassionaly, for 30-40 minutes or until veggies are browning
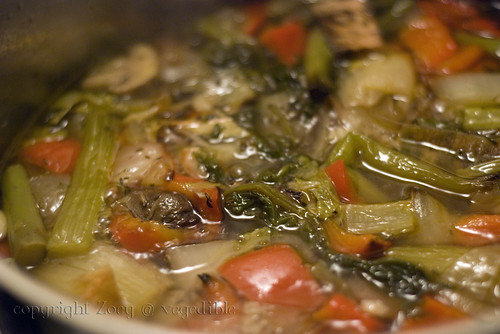
- Remove pan from oven and transfer veggies to stock pot. Deglaze the roasting pan with 1 cup of white wine, by boiling it for 2 minutes, and scraping down the sides of the pan. Or, do like I did and just pour the wine in, scrape a bit and dump it into the stock pot.
- Add bay leaves and water to the stock pot, bring to a boil, then turn down to simmer uncovered for 45 minutes, stirring occasionally.
- Strain stock, pushing against the veggie solids to release their juices. Season with salt and pepper. Stock should keep one week in the fridge or 3 months in the freezer.
I forgot to save some wine for the risotto (i.e. I drank it all the night before after making the stock) so if you also forget, just use some broth instead. I actually forgot to do that part too... And then I got confused because I hadn't measure out the stock I needed, I just heated up the stock I made the night before and added it a bit at a time, like when I normally make risotto. So I suggest that you measure out the amount of stock required, because otherwise the directions are very confusing.
Monday, March 8, 2010
A condiment for what ales you
condiment ˌkɒndɪm(ə)nt
noun
a substance such as salt or ketchup that is used to add flavor to food.
ORIGIN late Middle English : from Latin condimentum, from condire ‘to pickle.’
I really, really, really like condiments. Once, I read a blog post by dee Hobsbawn-Smith and she wrote that her fridge was full of homemade condiments. That was a couple of years ago, and at the time I couldn't really picture what kind of condiments she could possibly have in there. What condiments can you actually reproduce at home?
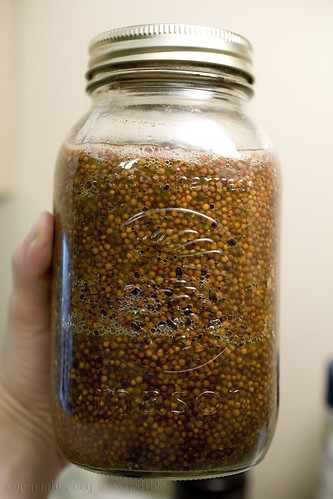
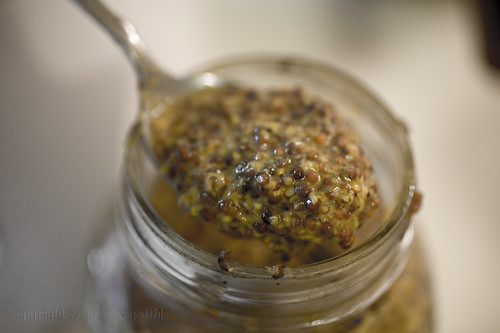
Beer, vinegar, mustard and seasonings marinating in a 1L jar.
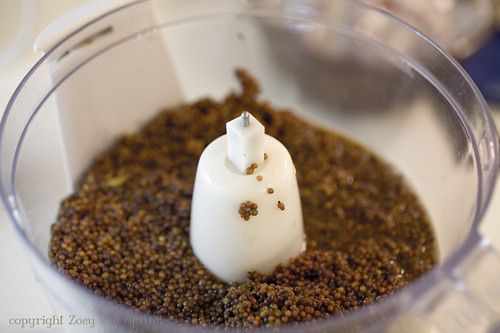
Before blending.

After blending.
A Spicy Mustard for what Ales you
Adapted lovingly from pictures and pancakes
yields 3 1/2 cups
1 341 ml oz bottle McNally’s Extra Ale (or Guinness, or any other dark, flavourful beer. Don't use Bud Light Lime)
10 oz (300 gr) brown mustard seeds
3 cloves garlic, smashed
1 cup apple cider vinegar
1 tbsp honey
1 tbsp salt
1 tsp freshly ground black pepper
1/2 tsp ground cinnamo
1/2 tsp ground cloves
1/2 tsp ground nutmeg
1/2 tsp ground allspice
1 tsp turmeric (for colour, skip if desired)
- Combine all ingredients in a non-reactive mixing bowl (i.e. not aluminum) or a 1-litre jar. Cover with plastic wrap, or a lid, and let sit at room temperature for 1-2 days.
- Transfer the mixture to a food processor and purée, scraping sides of the bowl as necessary.
- Process until most of the seeds are coarsley ground and the mixture thickens.
- Transfer to jars and refrigerate up to six months.
- You may find the mustard slightly bitter at first. I liked mine more after it had mellowed out in the fridge for a week or so. Of course, results will vary based on your beer of choice.

Saturday, March 6, 2010
Daring Bakers February: Tiramisu
The February 2010 Daring Bakers’ challenge was hosted by Aparna of My Diverse Kitchen and Deeba of Passionate About Baking. They chose Tiramisu as the challenge for the month. Their challenge recipe is based on recipes from The Washington Post, Cordon Bleu at Home and Baking Obsession.
Wow. I am posting this very late, even though I made the delicious cake about 2 weeks ago. I’m going to chalk it up to photography once more, unfortunately. So I don’t have a final photo, because even though there is a piece sitting in my fridge, I just can’t put this thing off any longer!
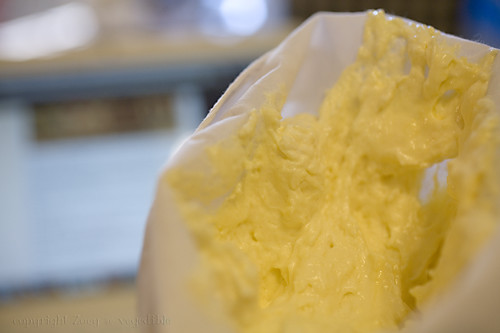
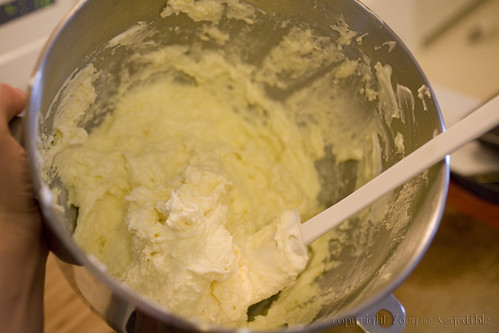
This was a pretty intense, from-scratch recipe. I made mascarpone cheese, zabaglione (coffee-based syrup-like stuff), pastry cream, whipped cream and savoiardi biscuits, which are meringue-ish ladyfingers.
I will absolutely make this tiramisu again, although next time I might dip my ladyfingers into something a little more punchy than the sweetened coffee concoction. Some Daring Bakers used fruit juice, and the recipe said to use espresso or marsala. My mum suggested I try it with Grand Marnier, and I think amaretto would be pretty delightful too.
My favourite part was the ladyfingers, or savoiardi, which are mostly egg, but lightly flavoured with lemon zest as well. They were not super special on their own, but when smothered in a pool of zabaglione-pastry cream-whipping cream, their lightness provided great balance to the cake. Next time though I will probably pipe the cookie batter in a shape that is more conducive to fitting my cake dish. I didn’t think I had enough cookies for my 9x9 inch pan, so used a couple of large circular ramekins instead, breaking the cookies to mostly fit inside.

If you’re interested in making a tiramisu, plan your time wisely. It was a multi-day project, including making mascarpone cheese from scratch. The final result was absolutely delicious, but I felt a little guilty eating so much of it myself…
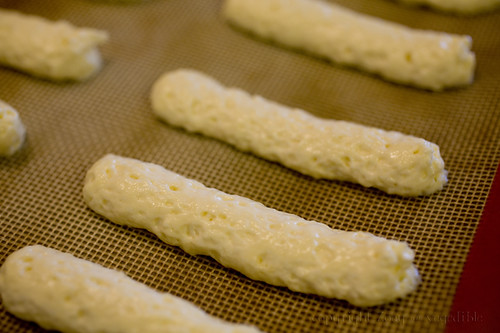
The cookie dough: a lot lighter than your chocolate chip in a tube!
Wow. I am posting this very late, even though I made the delicious cake about 2 weeks ago. I’m going to chalk it up to photography once more, unfortunately. So I don’t have a final photo, because even though there is a piece sitting in my fridge, I just can’t put this thing off any longer!
Cookie dough ready to pipe out
This was a pretty intense, from-scratch recipe. I made mascarpone cheese, zabaglione (coffee-based syrup-like stuff), pastry cream, whipped cream and savoiardi biscuits, which are meringue-ish ladyfingers.
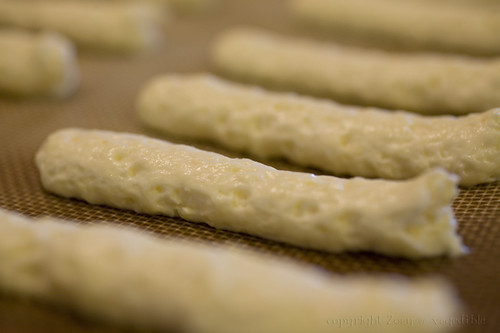
I don't know how, but I piped that dough real pretty!
I will absolutely make this tiramisu again, although next time I might dip my ladyfingers into something a little more punchy than the sweetened coffee concoction. Some Daring Bakers used fruit juice, and the recipe said to use espresso or marsala. My mum suggested I try it with Grand Marnier, and I think amaretto would be pretty delightful too.
Macro lens means a good view of bubbles in the ladyfingers.
My favourite part was the ladyfingers, or savoiardi, which are mostly egg, but lightly flavoured with lemon zest as well. They were not super special on their own, but when smothered in a pool of zabaglione-pastry cream-whipping cream, their lightness provided great balance to the cake. Next time though I will probably pipe the cookie batter in a shape that is more conducive to fitting my cake dish. I didn’t think I had enough cookies for my 9x9 inch pan, so used a couple of large circular ramekins instead, breaking the cookies to mostly fit inside.
This part was kind of complicated. I guess I don't have my sifting skills down yet.
If you’re interested in making a tiramisu, plan your time wisely. It was a multi-day project, including making mascarpone cheese from scratch. The final result was absolutely delicious, but I felt a little guilty eating so much of it myself…
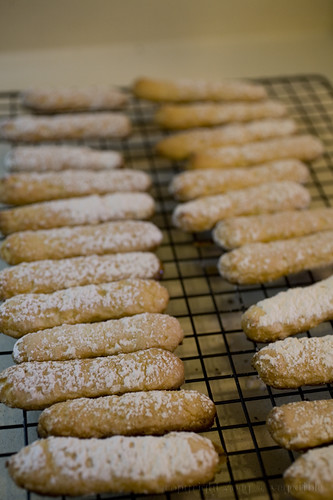
Voila! A little overcooked, but still delightful.
Friday, February 19, 2010
February Can Jam: Carrot Relish
I must say, when the February Can Jam feature ingredient turned out to be carrots, I was not excited. I am no carrot enthusiast. I do love a good, fresh springtime carrot from the farmer’s market, but those days are many weeks away. Inexperienced as I am in the ways of preserving, I still thought it was silly to go out of my way to can something out of season that I don’t like. But I did it anyway, in the name of education and condiments!
I considered pickled carrots, but aborted that idea after thinking about woody, wintertime carrots. Eventually, after getting a pickling book from the library, I settled on the idea of a relish.
Now, this was a silly idea too, as I’ve never been into relish. I made a hot pepper relish in the summer which was pretty good, but couldn’t name you another relish that I’d volunteer to sample. But I did it anyway.

I settled on carrot-onion relish, and the preliminary tasting yielded a pretty sweet, carrotty concoction. I’m going to let it sit the recommended 3 weeks and try again, and I will update you then.
Meanwhile, if you like the sound of it and want a jar (and you’re in town) let me know!
Carrot and Onion Relish
Adapted from The Complete Book of Pickling by Jennifer MacKenzie
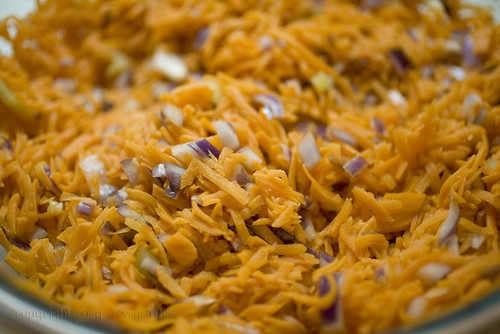
8 cups shredded carrots
2 cups finely chopped onions
2 small yellow hot peppers, finely chopped (this is my only mod)
2 tbsp pickling salt
1 ¾ cups sugar
2 tsp celery seed
1 tsp dried thyme
½ tsp freshly ground black pepper
2 cups cider vinegar
1 tbsp minced garlic
1. In a large non-reactive bowl, combine carrots, onions, peppers, and salt. Cover and let stand at a cool room temperature for 2 hours.
2. Meanwhile, prepare canner, jars and lids.
3. In a colander lined with cheesecloth, working in batches, drain vegetables and rinse well. Drain again and squeeze out excess liquid. Set aside in colander to continue draining.
4. In a large pot, combine sugar, celery seeds, thyme, pepper and veingar. Bring to a boil over medium heat, stirring often until sugar is dissolved. Increase heat to medium-high and add drained vegetables and garlic; return to a boil, stirring often. Reduce heat and boil gently, stirring often, for about 15 minutes or until vegetables are translucent and mixture is slightly thickened.
5. Ladle hot relish into jars, leaving ½ inch headspace. Remove air bubbles and adjust headspace as necessary by adding hot relish. Wipe rim and place hot lid disc on jar. Screw band down until fingertip tight.
6. Place jars in canner and return to a boil. Process for 10 minutes (add 10 minutes for Calgary). Turn off heat and remove canner lid. Let jars stand in water for 5 minutes. Transfer jars to a towel-lined surface and let stand for 24 hours.

Now, this was a silly idea too, as I’ve never been into relish. I made a hot pepper relish in the summer which was pretty good, but couldn’t name you another relish that I’d volunteer to sample. But I did it anyway.
I settled on carrot-onion relish, and the preliminary tasting yielded a pretty sweet, carrotty concoction. I’m going to let it sit the recommended 3 weeks and try again, and I will update you then.
Meanwhile, if you like the sound of it and want a jar (and you’re in town) let me know!
Carrot and Onion Relish
Adapted from The Complete Book of Pickling by Jennifer MacKenzie
8 cups shredded carrots
2 cups finely chopped onions
2 small yellow hot peppers, finely chopped (this is my only mod)
2 tbsp pickling salt
1 ¾ cups sugar
2 tsp celery seed
1 tsp dried thyme
½ tsp freshly ground black pepper
2 cups cider vinegar
1 tbsp minced garlic
1. In a large non-reactive bowl, combine carrots, onions, peppers, and salt. Cover and let stand at a cool room temperature for 2 hours.
2. Meanwhile, prepare canner, jars and lids.
3. In a colander lined with cheesecloth, working in batches, drain vegetables and rinse well. Drain again and squeeze out excess liquid. Set aside in colander to continue draining.
4. In a large pot, combine sugar, celery seeds, thyme, pepper and veingar. Bring to a boil over medium heat, stirring often until sugar is dissolved. Increase heat to medium-high and add drained vegetables and garlic; return to a boil, stirring often. Reduce heat and boil gently, stirring often, for about 15 minutes or until vegetables are translucent and mixture is slightly thickened.
5. Ladle hot relish into jars, leaving ½ inch headspace. Remove air bubbles and adjust headspace as necessary by adding hot relish. Wipe rim and place hot lid disc on jar. Screw band down until fingertip tight.
6. Place jars in canner and return to a boil. Process for 10 minutes (add 10 minutes for Calgary). Turn off heat and remove canner lid. Let jars stand in water for 5 minutes. Transfer jars to a towel-lined surface and let stand for 24 hours.
Daring Cooks February: Mezze!
Along with the alternating spring-like and wintry weather, February also brings Reading Week. For some university students, this means a week off to gallavant somewhere hot and humid. But for others, it's used as its name implies: a week to catch up on readings and assignments.
For me, it meant doing some more creative cooking than I have for the past few weeks. Last week, I did a one-week intensive cleanse much like the one I did a year ago. There was a lot of grumbling out of me, and more of the same kinds of refusals that I used last time – no horrible alkaline soup, for example. And I meant to blog about it, I really did! But the week before Reading Week was packed with newspaper production and midterms and lugging around a bajillion-pound broadcasting camera.
But I promise you (eep!) I am back on the Glorious Kitchen Unicorn of Blogginess. I have ideas that will probably, at some point, come to fruition, but I dare not mention them yet.
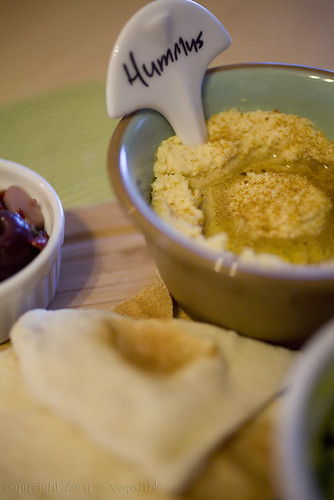
If you're on a reading break too, I implore you to make a little hummus. And if you have the fortitude, make some pita too. Yum.
The 2010 February Daring COOKs challenge was hosted by Michele of Veggie Num Nums. Michele chose to challenge everyone to make mezze based on various recipes from Claudia Roden, Jeffrey Alford and Naomi Dugid.
I cooked this up on Feb. 14, the day the challenge was due to be posted to my blog. I was down to the wire around 3 p.m. when I got home from an improv comedy class (horror of horrors! But it was kind of fun and I survived) and had an hour to get the house together before a friend arrived for sparkling wine and two kinds of cheese pie.
I make hummus with some regularity, but my past couple of batches have been kind of lumpy and...just wrong. But this recipe turned out just right. I think I might use a little more garlic in the future, but even as-is, it might be my new recipe. I halved the batch and added a couple of chipotle peppers with adobo sauce for a spicy smoky version.
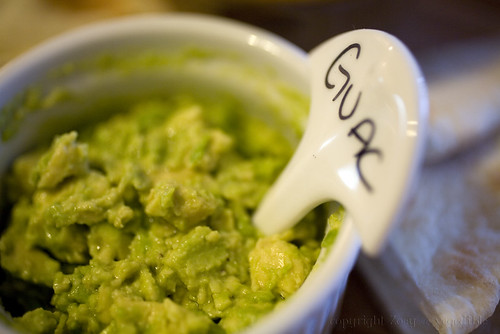
I made a simple guacamole when I fixed myself a hummus snack. Just mash half an avocado with some lime juice and a bit of salt.
Hummus – Recipe adapted from The New Book of Middle Eastern Food by Claudia Roden
Prep Time: Hummus can be made in about 15 minutes once the beans are cooked. If you’re using dried beans you need to soak them overnight and then cook them the next day which takes about 90 minutes.
1.5 cups dried chickpeas, soaked in cold water overnight (or substitute well drained canned chickpeas and omit the cooking) (10 ounces/301 grams)
2-2.5 lemons, juiced (3 ounces/89ml) *I didn't have fresh lemons so I used 4 tbsp of lemon juice.
2-3 garlic cloves, peeled and crushed
a big pinch of salt
4 tablespoons tahini (sesame paste) OR use peanut butter or any other nut butter—feel free to experiment) (1.5 ounces/45 grams) *Seriously, use tahini though. At my grocery stores it's either with the peanut butter or the in the "health" food area with almond butter etc.
additional flavorings (optional) I would use about 1/3 cup or a few ounces to start, and add more to taste
Directions:
- Drain and boil the soaked chickpeas in fresh water for about 1 ½ hours, or until tender. Drain, but reserve the cooking liquid.
- Puree the beans in a food processor (or you can use a potato masher) adding the cooking water as needed until you have a smooth paste.
- Add the rest of the ingredients and mix well. Adjust the seasonings to taste.
Not all my pitas puffed up as they were supposed to, and I think they would have browned more nicely if I had used a pizza stone instead of baking sheets, but they were all fabulous.
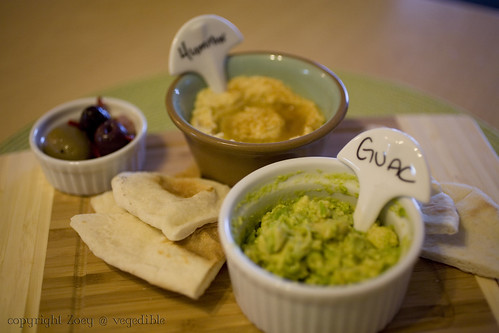
I put together a little tasting platter, all for me! It included one pita, some hummus, guacamole and a few olives.
Pita Bread – Recipe adapted from Flatbreads & Flavors by Jeffrey Alford and Naomi Duguid
Prep time: 20 minutes to make, 90 minutes to rise and about 45 minutes to cook
2 teaspoons regular dry yeast (.43 ounces/12.1 grams)Prep time: 20 minutes to make, 90 minutes to rise and about 45 minutes to cook
2.5 cups lukewarm water (21 ounces/591 grams)
5-6 cups all-purpose flour (may use a combination of 50% whole wheat and 50% all-purpose, or a combination of alternative flours for gluten free pita) (17.5 -21 ounces/497-596 grams)
1 tablespoon table salt (.50 ounces/15 grams)
2 tablespoons olive oil (.95 ounces/29 ml)
Directions:
- In a large bread bowl, sprinkle the yeast over the warm water. Stir to dissolve. Stir in 3 cups flour, a cup at a time, and then stir 100 times, about 1 minute, in the same direction to activate the gluten. Let this sponge rest for at least 10 minutes, or as long as 2 hours.
- Sprinkle the salt over the sponge and stir in the olive oil. Mix well. Add more flour, a cup at a time, until the dough is too stiff to stir. Turn it out onto a lightly floured surface and knead for 8 to 10 minutes, until smooth and elastic. Rinse out the bowl, dry, and lightly oil. Return the dough to the bowl and cover with plastic wrap. Let rise until at least doubled in size, approximately 1 1/2 hours.
- Place a pizza stone, or two small baking sheets, on the bottom rack of your oven, leaving a 1-inch gap all around between the stone or sheets and the oven walls to allow heat to circulate. Preheat the oven to 450F (230C). *I stacked 2 crappy baking sheets on top of one another.
- Gently punch down the dough. Divide the dough in half, and then set half aside, covered, while you work with the rest. Divide the other half into 8 equal pieces and flatten each piece with lightly floured hands. Roll out each piece to a circle 8 to 9 inches in diameter and less than 1/4 inch thick. Keep the rolled-out breads covered until ready to bake, but do not stack.
- Place 2 breads, or more if your oven is large enough, on the stone or baking sheets, and bake for 2 to 3 minutes, or until each bread has gone into a full balloon. If for some reason your bread doesn't puff up, don't worry it should still taste delicious. Wrap the baked breads together in a large kitchen towel to keep them warm and soft while you bake the remaining rolled-out breads. Then repeat with the rest of the dough.
Subscribe to:
Posts (Atom)